It usually starts with something small. A spot that didn’t used to be there. A cushion that looks a little more worn than the others. Before long, the sofa that everyone piles onto every day starts to feel a little… off.
When spring cleaning comes up, most of us picture closets, drawers, and that pile on the counter that never seems to go away. The sofa? It’s easy to overlook, even though it’s where we spend so much time every day. That’s why our team at Sav-Mart likes to keep things simple—a quick routine that keeps your favorite spot feeling fresh, without taking over your whole weekend.
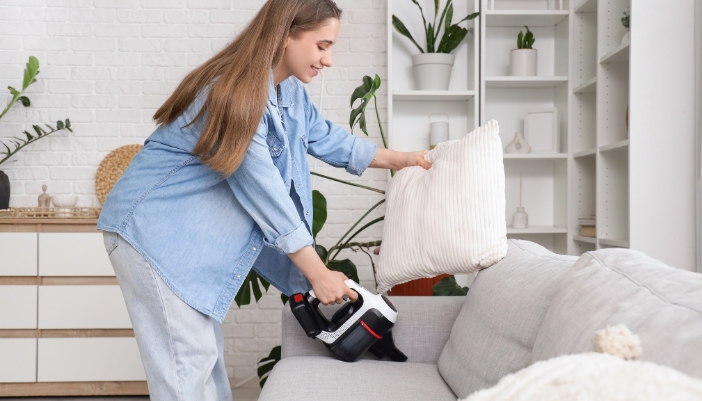
Step 1: Remove Cushions and Vacuum Everything
Take off all the seat and back cushions so you can reach the spots where crumbs and dust like to hide. Go slow with the vacuum, especially along seams, corners, and edges. Make sure to get the arms, the back, and the base under the cushions too.
Pro Tip:
Slowing down your vacuum passes makes a noticeable difference, especially on textured fabrics.
Step 2: Check Your Fabric Tag Before Using Any Cleaner
Before grabbing any cleaner, look for the fabric care tag. You’ll usually find it under a cushion or along the frame. It tells you what’s safe to use, so you don’t have to guess.
- W (Water-Based): Safe for water-based cleaners or light upholstery shampoo
- S (Solvent-Based): Use solvent cleaners only, avoid water
- WS (Water or Solvent): Either works, but keep it light
- X (Vacuum Only): No liquids, vacuum only, or professional cleaning
A quick check here saves you from surprises like faded spots, water marks, or stiff fabric later on.
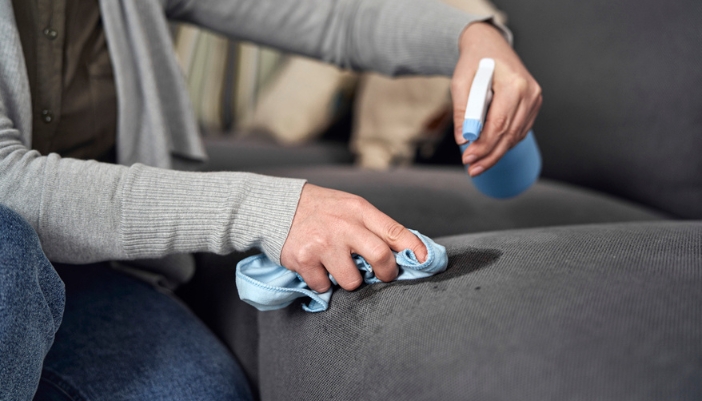
Step 3: Spot-Test and Treat Stains First
Try your cleaner on a hidden spot first, just to be safe. When you’re ready, gently blot stains with a clean cloth. Start at the edges and work inward, so the stain doesn’t spread, and use a light touch to keep the fabric looking good.
- Mild dish soap + water (W/WS fabrics): A simple, effective option for everyday stains
- White vinegar solution: Helps with light stains and lingering odors
- Upholstery-specific cleaner: A good choice for tougher or set-in spots
- Rubbing alcohol (S fabrics): Often safe for solvent-only materials, but always test first
Step 4: Clean High-Use Areas, Then the Rest
Begin with the spots that get the most use—armrests, seat fronts, and headrests. These areas pick up the most oils and daily wear. After that, go over the rest of the upholstery in small sections, keeping things light and not too wet.
Step 5: Deodorize and Let It Fully Dry
If the sofa still smells a little off, sprinkle on some baking soda or use a fabric-safe deodorizer. Let it sit for 15 to 30 minutes, then vacuum it up. Give everything time to air out before putting the cushions back. Open a window or turn on a fan if you want to speed things along.

Step 6: Rotate Cushions and Do a Quick Wear Check
Before you put everything back together, if your seating allows it, flip and rotate the cushions so they wear more evenly. While you’re at it, check the seams, edges, and spots that get the most use. Catching little problems now helps your sofa or chair last longer.
Pro Tip:
Rotating cushions every few weeks, not just during spring cleaning, helps maintain shape and comfort longer.
A Fresh Start That Feels Good Every Day
A freshly cleaned sofa just makes the whole room feel better. It looks sharper, feels more inviting, and suddenly everyone wants to settle in again. Keeping up with upholstery is easier than it sounds. A few simple steps, done every so often, help your sofa or chairs keep their shape, color, and comfort. It’s a small habit that makes a big difference every day.
If you’re not sure about fabric care, or if you’re thinking about replacing a favorite piece, our team at Sav-Mart is here to help. Come by and take a look around. There’s nothing quite like finding something that fits your space and your everyday life just right.